")
Whether it is for images or videos, galleries are everywhere on the web now. In fact, it’s rare to find a website that doesn’t contain an image gallery or video gallery. Studies show that almost 38% of visitors abandon a site with an unattractive layout. Now, you know how essential it is to have a stunning WordPress gallery on your site.
So, if you are looking to display the images and videos of your website in a professional as well as presentable way, a gallery is the one that can help you out.
Galleries ensure a better look at your website by arranging the images and videos in rows and columns occupying minimum space.
This way, you can offer users a better and quick browsing experience. We know how crucial it is to ensure a better user experience for any website.
Thus, we have come up with this guide about how to create a stunning WordPress gallery. So, if you want to learn, let’s get into this guide.
How to Create a Stunning WordPress Gallery?
Using a gallery you can conveniently display all your website’s images and videos as thumbnails or in a grid layout. This way, it helps you show more images and videos in less space and give your website users a better experience by letting them browse easier and faster.
And, the best part is, setting up a gallery is a matter of a few minutes. In this guide, we will show you how to create a gallery for both website images and videos. So, let’s walk through how to create a stunning WordPress gallery.
Creating Image Gallery in WordPress
There are two different methods you can create an image gallery on your WordPress website. For example,
- Using the default WordPress image gallery block, and
- Using a WordPress plugin
So, let’s see how to create an image gallery in WordPress.
Method 1: Use WordPress’s Built-In Gallery
So, to begin, first, login to your WordPress dashboard, and then do the following-
- Select the posts or pages from the left side of the dashboard.
- From here, you can select the “Add New” button, or can use an existing post to add an image gallery.
- If you are editing an existing page, simply, place the cursor where you need to place your image gallery, and select the “Add Media” button.
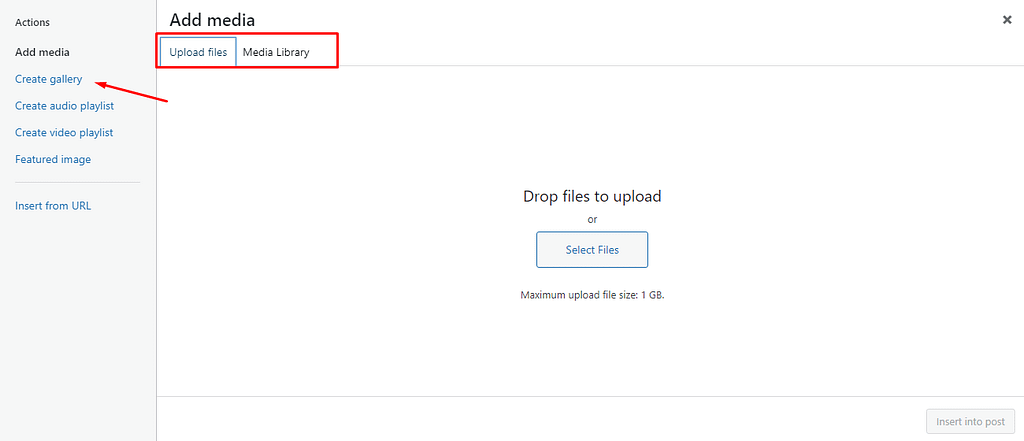
- Then, click on the “Create Gallery” option, and from there, you can upload the images or use the media library images.
- Finally, once you have selected all the images, just click on “Create a new gallery” from the bottom right side.
Now, if you want, you can edit the gallery before inserting it into your WordPress page or post. So, here’s how you can edit the WordPress image gallery.
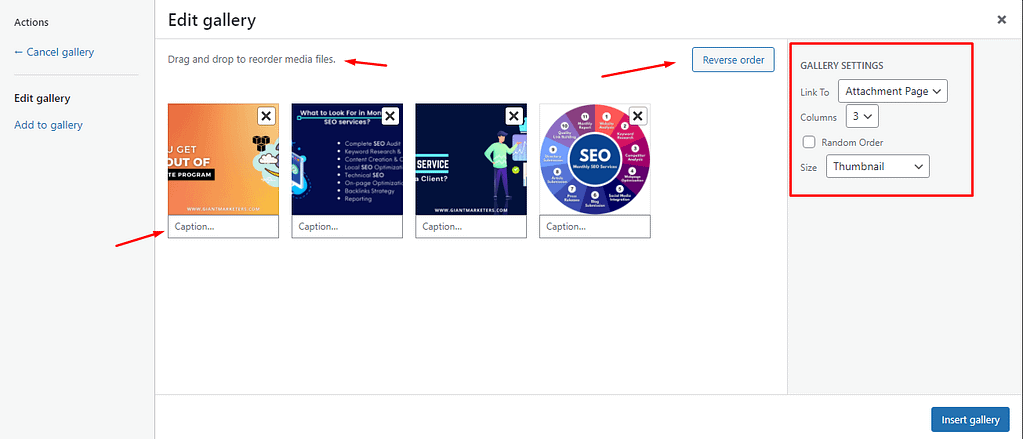
- Select the Edit Gallery option, and from this page, you will have the option to edit all your images.
- To reorder the images, use the drag and drop option, or you can also select the “Reverse Order” button.
In terms of SEO, you should also add titles, captions, descriptions, and alt text to each image. So, navigate to the right-side Gallery Settings bar, and from there, do the following-
- Select how many columns you want to display in your WordPress image gallery.
- You can enable the “Crop Image” option if you want to make the thumbnail images aligned.
- Also, from the same gallery setting bar, you can select the Link To preference and the size of the images.
- Now, click on the images one by one and add Alt Text, title, caption, and description.
- Once done, simply click on the Insert Gallery option or update your existing post or page.
Method 2: Using a Plugin
Adding an image gallery using the built-in function of WordPress is really easy, but there are some drawbacks. For example, you can’t open an image on a new page, you have minimal options to enhance the look of the gallery, and it also comes with fewer features.
In that case, if you want to take your WordPress gallery to an advanced level, using plugins would be the best choice for you. There are thousands of plugins available, and here are the best ones.
- Envira Gallery
- Galleries
- NextGen Gallery
- Final Tiles WordPress Gallery
- Modula Image Gallery
You just need to pick the most suitable plugin for your site and install and activate it from your WordPress dashboard. Once the activation is done, simply navigate to the plugin and start creating your image gallery with all the advanced edits, modifications, and customization options.
Creating a Video Gallery in WordPress
Now that you have learned the steps to create an image gallery, it’s time to see how to create a video gallery in WordPress. Usually, using WordPress, you can embed videos one after another, but it won’t look much appealing.
In this case, it is best to use a plugin to add a video gallery to your WordPress website; in fact, it is the easiest and quickest way ever. Just like the image gallery plugin, you will find several best WordPress video plugin to use on your site. Here are the best ones-
- WordPress YouTube Video Gallery
- WP Video LightBox
- Embed Plus for YouTube
- Video Gallery
- All-In-One Video Gallery
In this guide, we’ll show how you can add a video gallery using the WordPress YouTube Video Gallery plugin. So, here are the steps-
Step 1: Install WordPress YouTube Video Gallery
First, install and activate this plugin, just as you would for any other plugin.
Step 2: Add Video Gallery with Thumbnails to WordPress Page
Once the activation is done, head over to the newly appeared “YouTube Gallery” menu from your WordPress dashboard.
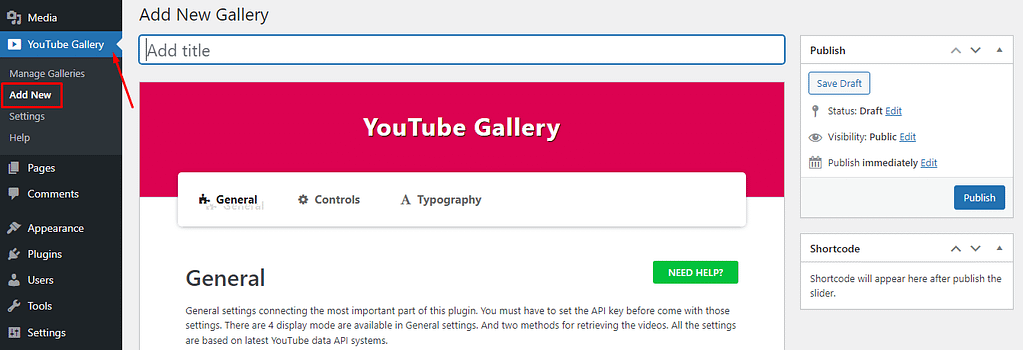
- From there, select the Add New button; if you want, you can make some customization and then click on Publish.
- And then, you will get a shortcode just below the published button.
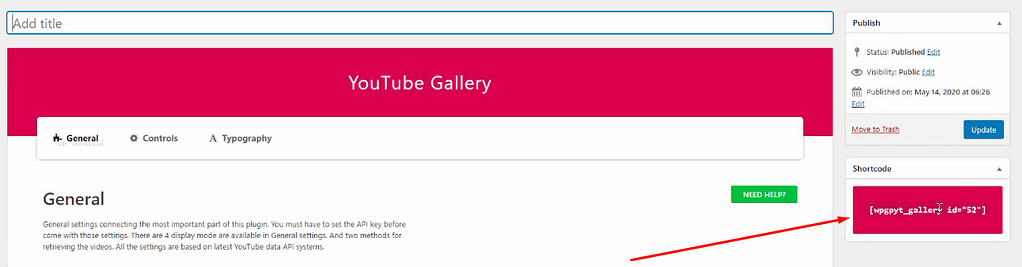
- Simply make a copy of that shortcode.
- Navigate to your Pages > Add New and give a title to your post.
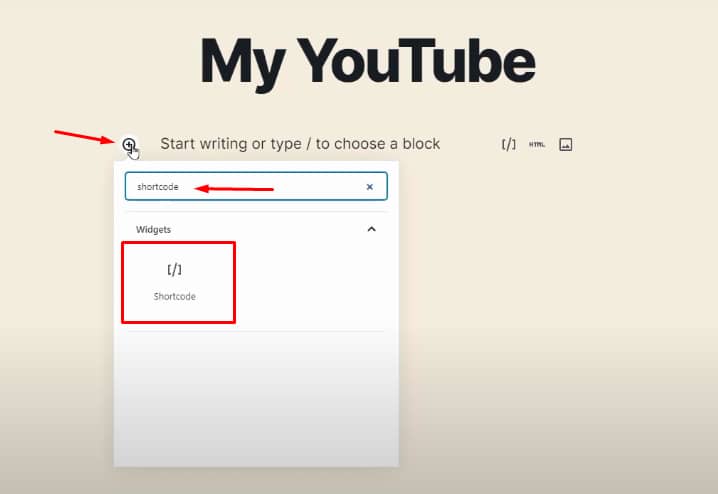
- Then click on the (+) button, and type the shortcode on the box, once you get the shortcode block click on it, and paste the shortcode into the box.
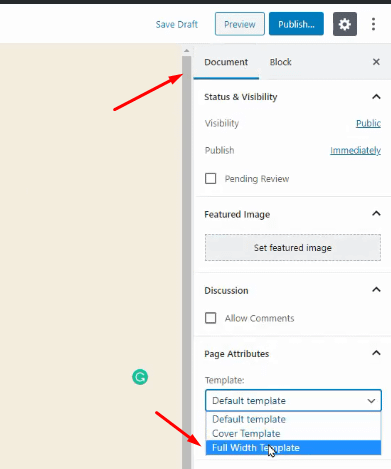
- Now, navigate to the right side corner of the same page, choose “Document” and from here, change the page attribute to full-width template.
Once done, click on the publish button.
Step 3: Adding API Key
Now, it’s time to add the API key, and here are the steps for adding the API key.
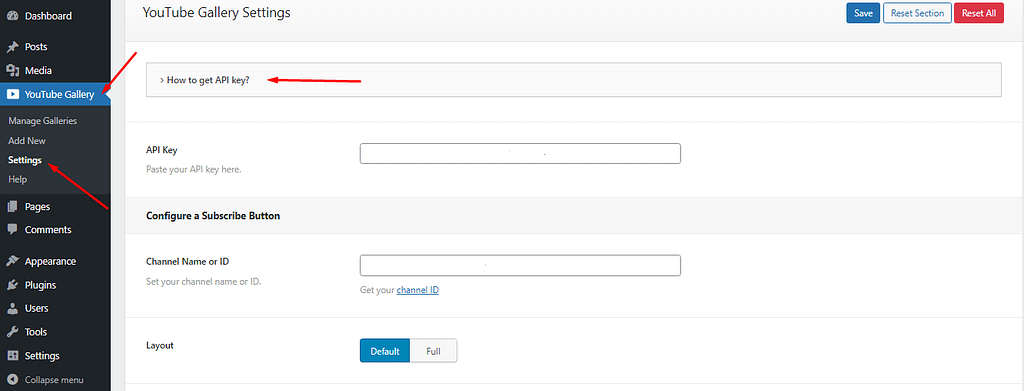
- Just like before, click on the “YouTube Gallery” > Settings > “How to get API key” > “Google API Console.”
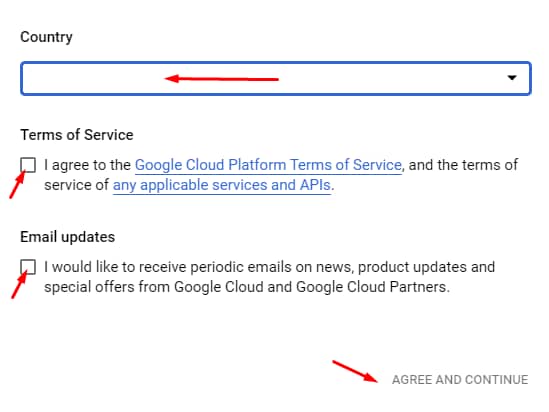
- Now, you will redirect to another page, and you will see a prompt. From there select your country, put a tick on both terms of services and email updates options, and click on Agree and Continue.
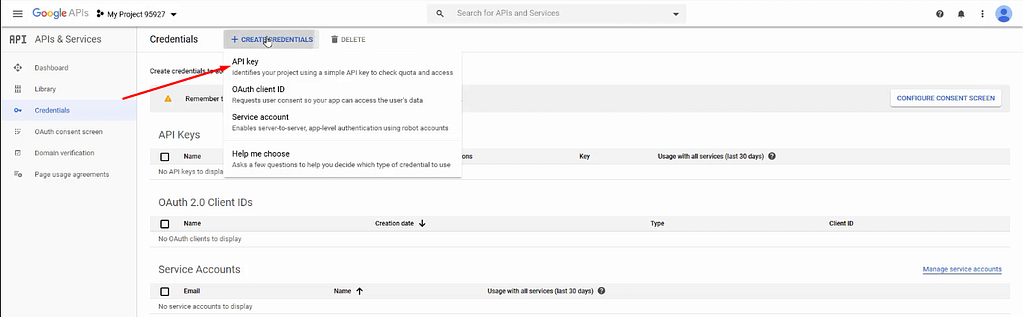
- Next, from the API & Service page, you need to select the Credential button.
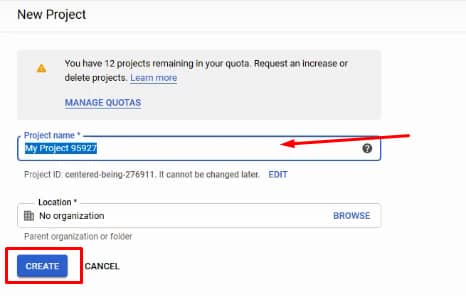
- Then, choose “Create Project” name your project, and hit the create button.
- Now, your API is created, and to get the API, select the“+ create credentials > API Key.”
- Once done, you will get the API key; now, simply copy it.
- Finally, go to the “YouTube Gallery Settings” page and paste the API key on the API Key box.
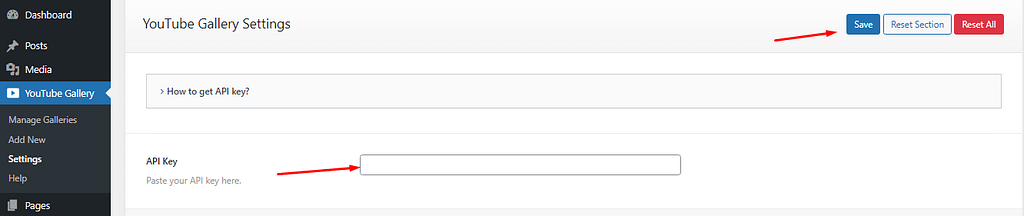
- Lastly, save the changes, and now you can see the video by visiting the main page.
Creating a video gallery in WordPress is just as easy, and similarly, you can add multiple YouTube videos to your WordPress site.
Wrapping Up
To use basic galleries, you can use the WordPress built-in gallery functions. But if you need something advanced, then you must use the dedicated gallery plugin to have more customization options. In both ways, you can create website galleries with ease.
We hope you find this how-to create a stunning WordPress gallery guide helpful. It’s not that tough; simply follow this guide, pick the most suitable method and start creating galleries on your site. Don’t forget to share your thoughts about this guide; also let us know which method you find most useful.
")


")


")